Kayak Ping Pong Ball Night Running Light
I wanted to enjoy some evening kayaking and the only missing piece was a white running light. A few trips to the local kayak and marine shops gave me an idea what the options were. Most of the options were a variant of a waterproofed C-cell sized flashlights mounted on a short metal tube. The better options used a white LED and these were all over $40 and some were over $60.
After thinking about the options I decided to focus more on the requirements: A white light visible from 360 degrees around the kayak. It had to be reasonably waterproof and last all night on a minimum power supply. I wanted the light to be light weight, fit in the rod holder behind my seat and be tall enough to extend over my head. Ideally, it should also float. The cost should be about $10 to make.
I already had the PVC and glue for it so the only parts that I needed were the threaded adapters and the 1/2" end cap. More on that later. I used PVC cleaner to get the writing off of the pipe and make it all white.
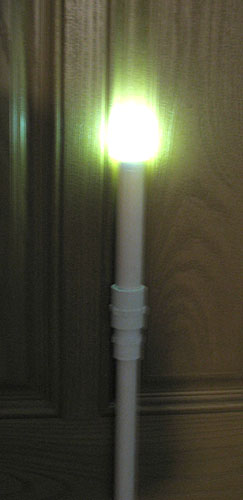
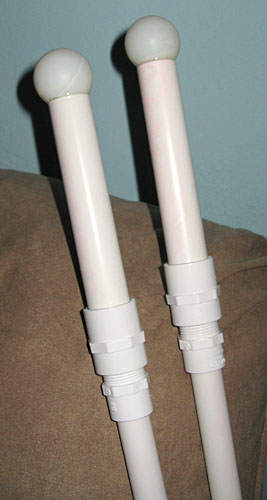
A pair of the finished lights, which met all of the design goals, are in the photo to the right. Yes, those are ping pong balls on the top. If you want to see the details, keep reading...
To get things started, I needed to locate a light source. A White LED (actually they're blue LEDs with filters to make it look white) was the obvious choice. These generally need two or three batteries to operate and, often, also need a heat sink for the brighter LEDs. I found a RayOVac LED penlight at the local Wal-Mart that ran on one AAA battery and ran cool, all for under $3.
This light would need a diffuser and something to protect it from the elements - sea spray and rain. After seeing an AP wire photo of a ping pong tournament the choice was obvious - a ping ping ball. Since these are a bit fragile I chose to fill it with epoxy. This would serve three purposes: Strengthen the ping pong ball, help diffuse the light inside and anchor the LED. The 2-Ton epoxy turned out to be perfect for the job.
This would be mounted on a PVC pole. PVC is great stuff! I tried both schedule 40 and schedule 80 PVC, the thinner schedule 40 works fine for both the 3/4" and the 1/2" tube and even allows the 3/4" tube to glow a bit. The thinner tube is also noticeably lighter for the 1/2" tube.

The ping pong ball was cut to eliminate the logo. The cut needs to be small enough so that the cut is about 1/2". This will give it some surface area when glued to the PVC and still be large enough to fit the LED assembly. In the photo to the right, the cutout would, ideally, be a little smaller than what is shown, although this worked.The LED assembly is removed from the penlight. This is the LED assembly (white tube) and the golden metal tube of the penlight, which wasn't used for this project.
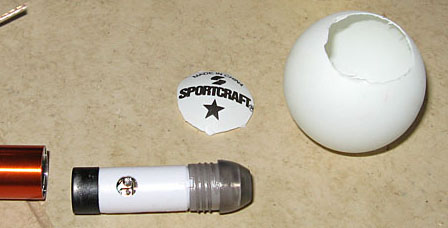
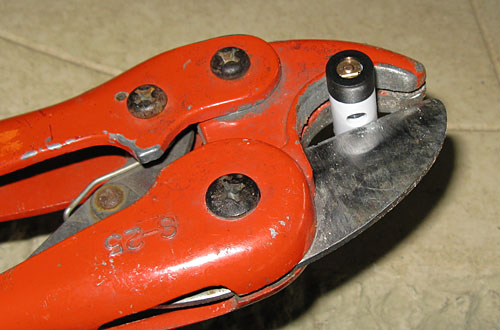
The LED is an inch or so back in the assembly and we need to get it exposed and allow the light to fill the inside of the ping pong ball. To do this I used a PVC pipe cutter to carefully cut around the LED (right). A hack saw could be used, just go slowly. When finished, the white LED is exposed and the electronics are intact (below). I lightly roughed up the LED with some 120 sandpaper (not shown) so it would better bond to the epoxy later. The copper contact tabs are on the end (+) and other side (-) of the LED portion.

The ping pong ball was filled epoxy in three layers The epoxy was mixed within the ball each time, mostly to save epoxy. Actually, one tube won't complete fill the ball, but it's enough. During the mixing I made sure that the complete inside of the ball was coated to add layers of strength for the small part that isn't filled later. I used a trailer license plate holder with a round opening to hold the ping pong ball in place. The first layer of epoxy was added in the photo to the right.
When the third layer of epoxy was added and thoroughly mixed the led was submerged in it and held in place until the epoxy set. Everything was then left alone for 24 hours.
Below is the ping pong ball with the LED assembly in place and the wires soldered to it.
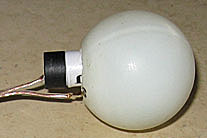
The LED was wired to a Radio Shack single AA battery holder. The AA battery usually has more than twice the milliamp hour rating of a AAA battery with the same voltage. In the first power test using a single, old, NiMH 2050 mAh battery the light stayed bright for more than 15 hours. Since most white LEDs require more than 1.2volts, I expect that the LED assembly has some step-up circuitry built in it, but that wasn't confirmed.
Save a little of the epoxy to glue the ping-pong ball to the PVC later. Clean both the PVC and ping pong ball with alcohol before the final glue-up. I also experimented with GE Silicon II, but it did not stick well to the PVC. The epoxy holds the ping pong ball to the PVC very well.; The bubbles in the epoxy help spread the light in the ball nicely.

Not all Epoxy is equal. I attempted to use a 5 minute epoxy on a second set of lights (the first set used 30 minute epoxy). It became so hot that it turned the inside of the ping pong ball a dark golden color, which would block much of the light from getting out. The 30 minute epoxy reacted slower and, while still became hot, was not hot enough to change the color of the plastic. Having quite a bit of 5 minute epoxy I decided to try again, this time by floating the ping pong ball in a bowl of ice water during the first 30 minutes of hardening. The epoxy still set and the ping pong ball stayed a pristine white inside.
The LED needs to be completely in the epoxy (not the white plastic part, just the clear LED). If only the tip is in much of the light will be reflected down off of the flat surface of the epoxy and not out of the ping pong ball. I've made seven lights as of 5-1-2009 to test this. As of mid 2023 they are all still working.
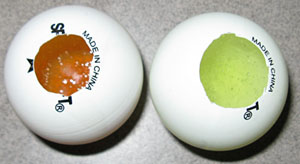
Both ping pong balls have the same 5 minute epoxy in them. The one on the right was allowed to cure while floating in a bowl of water with ice cubes in it which prevented the plastic from discoloring from the reaction heat.
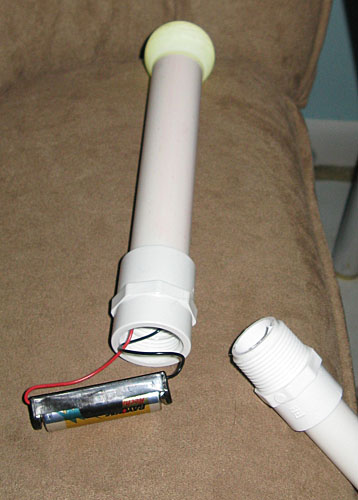
To keep corrosion down there isn't a on-off switch. When the battery is in the light is on. The single battery holder fits perfectly in 3/4" PVC. By having the female threads on top the opening still allows the battery holder to fit and rain is less likely to get into the tube. The male threads are a 3/4 thread to a 1/2" slip. This blocks the battery from being supported by the wires when the pieces are screwed together and keeps the majority of the tube length smaller and a little lighter.
Silicon grease was put on the threads to prevent binding. It doesn't need to be very tight to hold well.
The length of the bottom is about 4', but that's up to you. I may make mine a little shorter or add another threaded break in the 1/2" pole to allow it to collapse. The bottom end of the 1/2" PVC is capped.
I later added a little foam around the base of the pole with plastic pull ties to make a snugger fit in the fishing rod holder.
This floats nicely and I occasionally stick it under water to light up whatever is under the yak.
For an added safety measure I added some 1 3M Scotchlite reflective tape on the PVC just under the ping pong ball. In hindsight, the PVC glows a bit and it might have been better located at the bottom of the 3/4" PVC near the fitting where the battery goes in.
A gentleman emailed me about this light and, after building one, suggested that a black sock be used in place of a on/off switch. Just cover the ping-pong ball and you're in stealth mode. Great idea!
