Buffet Cabinet to Digital Piano Cabinet

The goal was to find a buffet style cabinet that could be modified to hold (hide) a Roland FP-30 digital piano. The cabinet was found on Facebook marketplace. The color was too dark, the drawer openings were too short even if the vertical supports between them was removed. At least the width and depth would work. Note that this project is completely independent of any actual ability to play a piano.


Original Cabinet

This is the cabinet as it came in the door. It's made entirely of solid wood, no veneers or plywood were used until we made changes to it. The drawer pulls will be saved for the new front panel. The supports between drawers was cut out and the hole was also made about 1-1/2" taller.

Modified Cabinet

The finished cabinet looks pretty good. The wood was sanded to take off some of the orange finish and then coated with Polycrylic. The new drawer front was made from 1/4" Birch plywood with an in-stock then stained and Polycryliced to (almost) match the new cabinet look.

Piano Test Fit

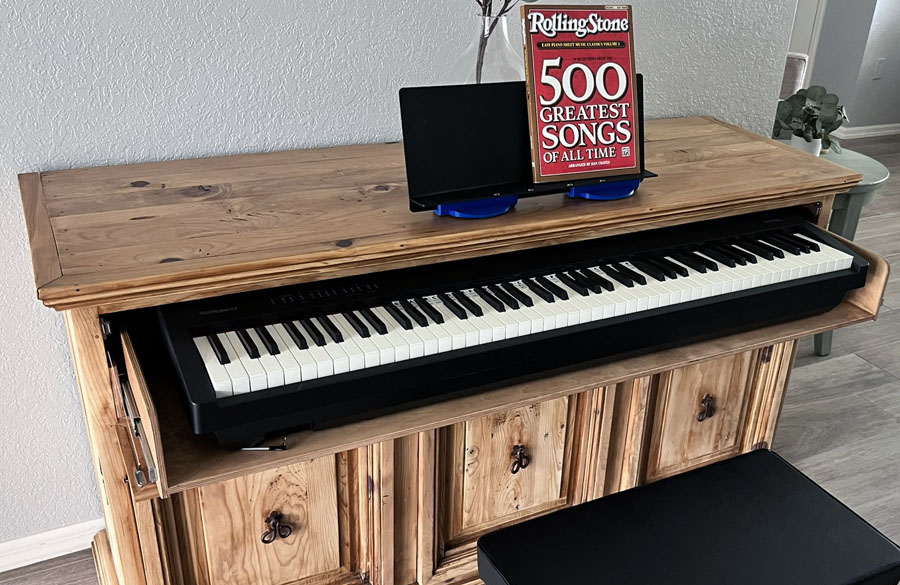
The drop-down drawer front was installed and can be seen flipped down under the slide-out drawer. The key height is about 1/2" taller than the previous 'X' stand. The music rest will be placed on top of the cabinet using a 3D printed base for the existing holder.

The Plan

The project was broken into separate parts. Tracee handled the exterior sanding and re-staining as well as designing the new face plate to replace the removed three drawers. I worked on the mechanics of making the drawer openings one opening and taller to fit the piano, add side supports and make a drawer that will support about 50 pounds.

Plan Drawing

The drawing above was my initial Visio drawing of the parts. The side drawer slider supports being on the outsides then the sliders and the drawer. The cut out that lowered the back drawer support and the UHMW supports (discussed later) were added as the pieces came together.

Refinishing

The pine cabinet was stained too dark from the factory that applied brown furniture wax. That had to be removed with mineral spirits first. After that Tracee took to the palm sander and about 20 quarter sheets of 120 grit later the main cabinet was lightened up nicely. The cut off parts left over from making the opening larger were used to test the stain. The cabinet top needed some thinned stain. The newly built drop-down front and the drawer needed a different mix. After some experimenting with birch plywood and pine trim cutoffs the drawer and new drop-down front were mostly matched. The front still needs the pulls from the old drawers added to make the pieces all look like they belong together.

After the stain was dry we decided to coat the cabinet top and new drawer with matt finish Polycrylic. I usually use Spar Urethane for the telescopes but this will be inside and two coats of Polycrylic should give it enough protection to handle a cup ring, drip or a spill. After all, this is a buffet cabinet and may be still used to occasionally to hold trays of food on the top.

The Slide Out Drawer
Slide-out Drawer

The drawer slide sider supports were pre-drilled before being installed to match the slider mounting holes. They are made of 1/2" plywood with a strip of 3/8" plywood behind it that follows where the steel sliders will screw into it. At each end it attaches to the vertical wood sides of the cabinet with both Tite-bond III wood glue and four or five 1" brads. These boards are going nowhere.

Each drawer slider is 1/2" thick and the pair are rated to support 100 pounds. The piano weighs about 31 pounds and add another couple of pounds for its power supply and extension cord with built-in USB power ports and an on/off switch. The drawer adds another 14 pounds (Baltic Birch is dense). It looks like the weight will be about 48 pounds, which is well under the 100 pound limit.
Drawer Glue-Up

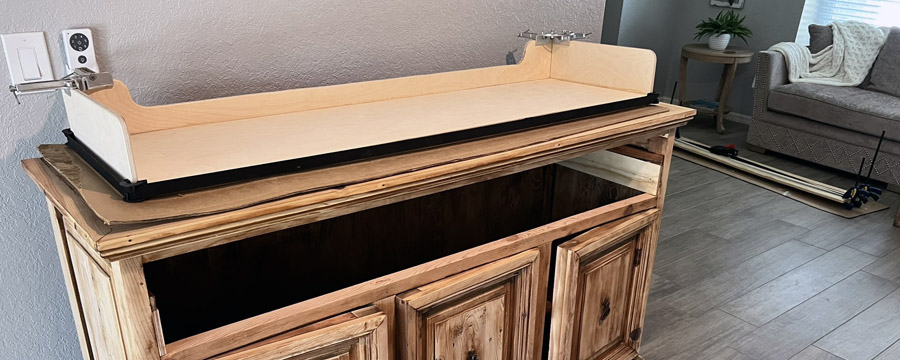
Above is the drawer during glue-up. Corner clamps were used at the top and a band clamp around the bottom. Two more clamps were added (not shown) to squeeze the sides and the back to the bottom board on the dado. In the background on the floor is the drop down front being glued up.

The drawer support needed to be defined before the needed height of the front hole could be known. Since the drawer was going to be 56-1/2" wide, including the sides, it needed some strength. I happened to have some 1/2" Baltic Birch for an upcoming telescope project and that seemed about right for the drawer also. I decided to go with a three sided drawer leaving the front open. Dado's would allow the bottom of the drawer to be firmly supported by the three sides. The front will flex a bit from the weight but there's a plan for that.
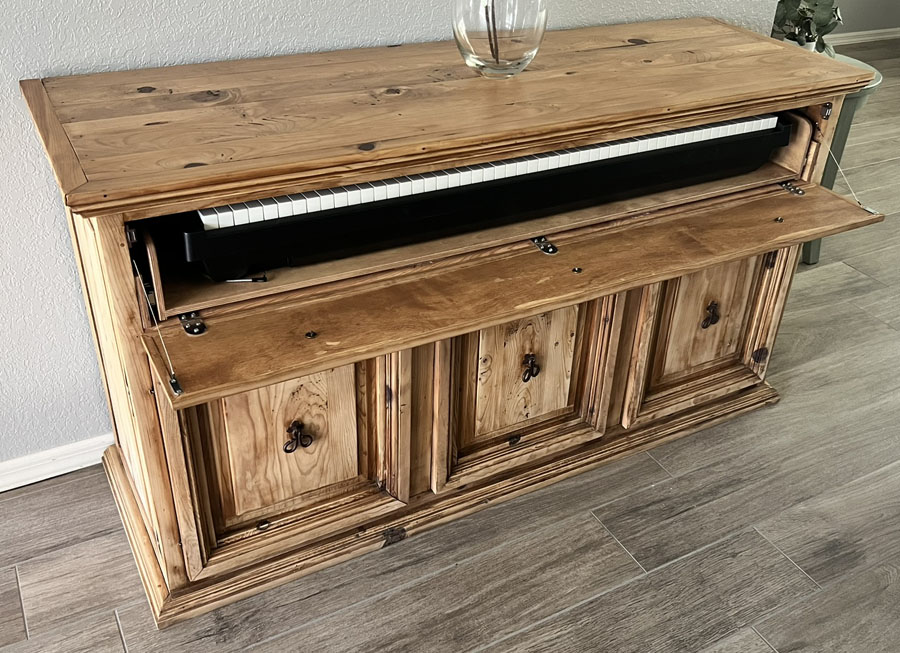
Front Open

The drop down face plate open with the drawer retracted. Three hinges were used along the bottom and support wires stop the opening at 90 degrees from being closed.
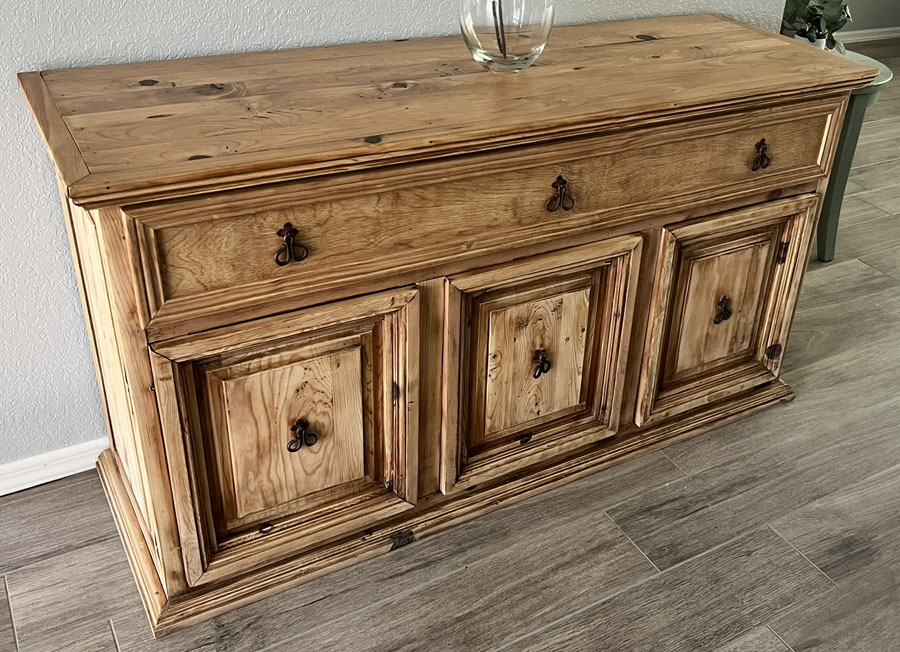
Front Closed

The magnetic latches at the inner tops of the drawer front keep it from falling open.
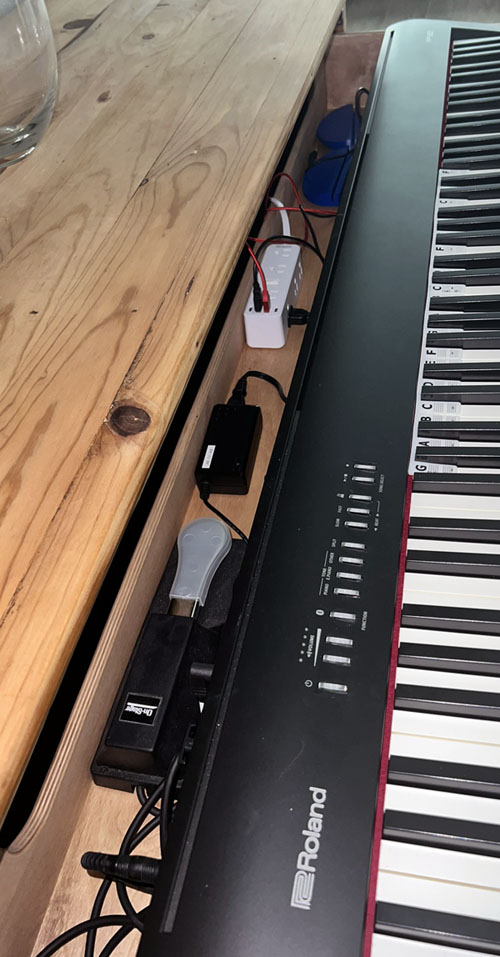
Behind the Drawer

The drawer is 16" deep. With the back support that leaves about 15-3/4" of usable depth. The piano is about 12" deep which leaves enough room to store the foot pedal, power supply, extension power with on/off switch and USB power and the 3D printed bases that support the music rest.

The Drop-Down Drawer Front

Drop-Down Drawer Closed

Drop-Down Drawer Open

With the original three drawers out and the opening made larger a new front panel was needed. It needed to be light weight, have a decent edge moulding border to align with the rest of the cabinet and not stick out too far so it didn't get in the way of our legs when at the piano.

The main flat panel was 1/4" birch plywood form the local Home Depot. Unfortunately this piece was over 4' long so we needed to purchase a full 4' x 8' sheet. The moulding, from the same store, had a 1/4" deep notch about a third of the way into the moulding out of the back that made a perfect place to glue the plywood to it. The moulding was made of pine so staining the two different types of wood to match was challenging. I didn't weigh this separately but I doubt if came to two pounds. The hinges were from Amazon. We considered recessing them into the board of the cabinet but when we tried them without being recessed they worked nicely and could not be easily seen.

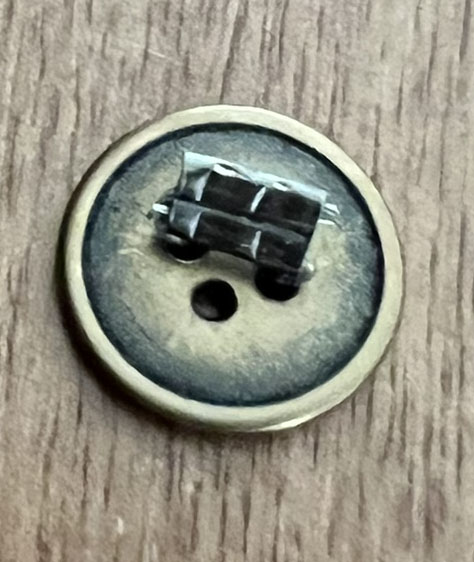
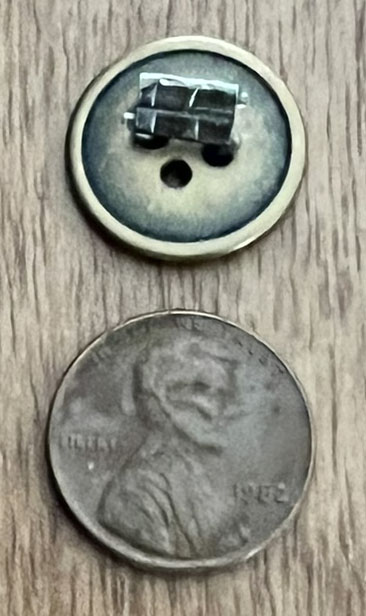
The drawer pulls look like they were made by a blacksmith, which may be the intent or they may have been made by one. We wanted to keep them and add the pulls to the new drawer front. The originals used a heavy, stiff wire to hold them in placed and the wire passed through the 3/4" drawer fronts and was turned and pushed into the wood in the back of the drawer front. This wasn't practical with our 1/4" plywood drawer front. To fake it we used 60 pound test fishing leader wire. That was looped around the pull and through the squarish metal piece behind it. On the back side the leader material went through a dime sized bronze colored metal button from the local fabric shop (strangely, these came in a three pack) and the two ends were crimped together using a fishing leader sleeve. The finishing touch was a bit of dark brown furniture touch-up paint on the exposed leader wire's plastic coating to make it match the metal.

Button Backing


The Moving Parts

Drop Front Support

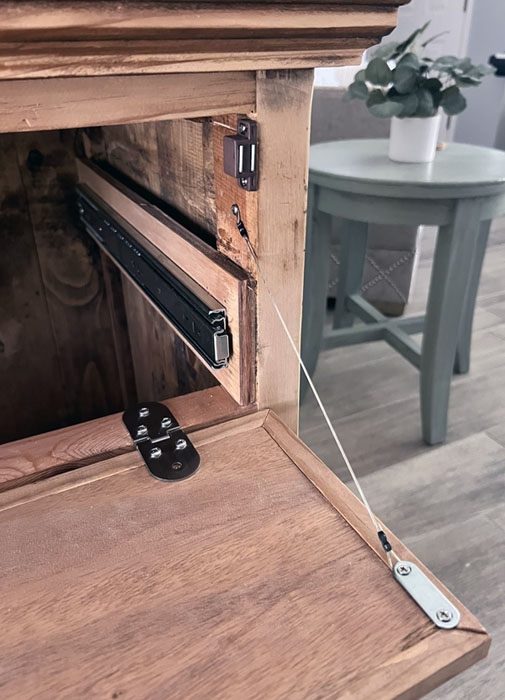
This shows the inner workings of the moving parts. The drawer sliders are supported by the plywood glued and 18 gauge brad nailed to the cabinet supports. Three hinges were placed along the bottom (one screw was yet to be installed here). The limiting wire is 80 pound test fishing leader wire attached at each end. A magnetic latch near the top was used to keep the front closed.

In a number of places I needed to use 1/2" wood screws. Where possible I pre-drilled a hole to either prevent the wood from splitting or to be the location marker for the screw. Sometimes it was for both reasons. When I put the screws in I did it with a manual screw driver and placed a finger on the other side of the wood to make sure that the screw tip wasn't bulging the wood to make sure that it wouldn't break through. The sides of the drawer where the side slider rails attached to it had this issue. I needed to cut off the tips of 10 screws so that they wouldn't poke into the interior of the drawer.


UHMW Center Supports

Since the front of the drawer doesn't have a front side panel it will flex a bit with the weight of the piano. Given enough time I would expect that the weight would permanently bow the bottom of the drawer. To mitigate this I used 1/2" Baltic Birch plywood, which unlike regular plywood, has many more layers (plys) that helps stiffen it and each layer is quality wood without voids. That helps, and also makes the plywood heavier, but it wasn't quite enough. Also to help the Baltic Birch had a very slight bow to it and the drawer bottom was placed bowing up to help counteract the piano's weight.

This next idea came from my telescope building where Teflon and Formica are frequently used to allow the motion of the telescope to be smooth although neither Teflon or Formica were used.

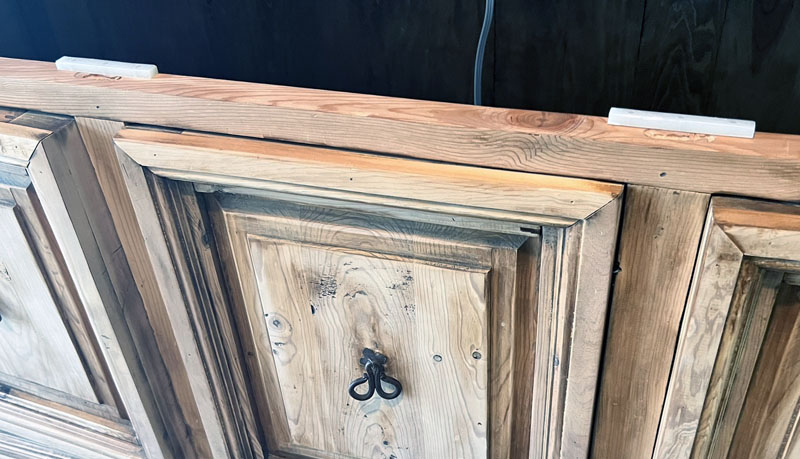
At the front of the drawer and below it is a horizontal piece of wood that is the top of the lower cabinets. This was cut down a bit to make the piano opening larger. The gap between that horizontal piece and the bottom of the outer edge of the drawer is 1/4". The bottom of the drawer is a bit higher and clears it by about 1/2". I cut two pieces of UHMW (Ultra High Molecular Weight) plastic placed over the vertical supports and about 3/8" tall. This is the same plastic used in table saw fences. The top of the UHMW sliders left about 1/8" between them and the bottom of the drawer.

When open, the drawer doesn't come into contact with the UHMW until it is about 3/4 closed and continues making contact as it is fully closed. Even with the piano's weight and completely closed it only lightly makes contact, but it is still new. This supports the drawer and should help prevent any significant bowing. The UHMW also catches on the back panel of the drawer and stops it from opening further. The UHMW supports can only be seen if you look under the drawer.

Front Support Sliders

The 4" wide UHMW with #4 screws counter sunk so that the heads won't scrape into the bottom of the drawer.

Front Support Sliders Installed

The sliders installed over the vertical supports. The top edges of each piece was beveled slightly to make a smooth motion on the bottom of the drawer.

Front Support Sliders with Drawer

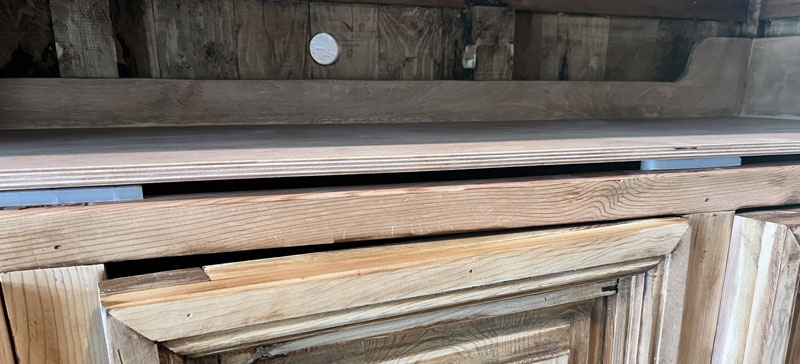
There is a small gap between the top of the left UHMW piece and the drawer bottom without the piano weight on the drawer. The nine layers of the Baltic Birch, not counting the veneer, is also visible. This is before the front drop-down panel and hinges were installed. The hole in the back is for the power cord.


The Music Rest

3D Music Base
Music Rest

The music rest was designed to fit into a slot on the top of the keyboard. If the keyboard is extended all of the way that works. I prefer that the keyboard is pushed in a bit. This has the slot partially covered by the top of the drawer. My solution was to 3D print a pair of bases to support the music rest that allows it to to be placed on the cabinet's top. The bottoms of each support is hollowed out in case I need to make it weighted. I usually use epoxy with stainless washers or lead sinkers embedded in it to add to the weight. When the epoxy hardens flat I'll cover the bottom with stick-on felt or rubberized feet to protect the cabinet. At the moment the extra weight wasn't needed and rubber feet are doing the job.

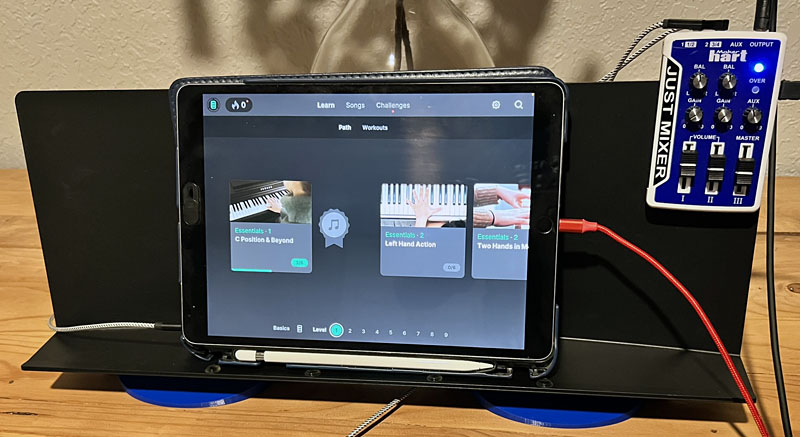
In addition to holding an iPad the music rest also holds a small audio mixer that allows me to plug in the audio output from the keyboard and the iPad and listen to them both through headphones. Tracee, the neighbors and any nearby animals with decent hearing are all grateful for this arrangement.

I'm using Yousician on the iPad. I hope that it's up for the challenge ahead.


Final Thoughts

I'm not a cabinet maker but I feel pretty good about the modifications made to this piece. In hindsight maybe 1-1/2" front on the drawer would have prevented it from sagging and precluded the need for the UHMW supports. I like the front not being blocked. Which option is better? I'll let you know in a year or so.

There is a slight bounce in the drawer when the piano keys are pressed with any force. It's noticeable but not really annoying. It's more pronounced if the drawer is pulled out all the way, which I only do to access items behind the piano, not to play (play here is used very generously). Some is from the flex in the drawer and some is from the side drawer slides, mostly when they are fully extended. There wasn't much vertical space left to work with but the previously mentioned drawer front panel may have helped a bit. The drawer was designed so that it could be added if needed.

If I did this again the buttons on the back of the drop-down panel that supports the drawer pulls would be made using old pennies with two holes drilled in each. Instead of $5 it would have cost me $0.03. I think that there is something about not being allowed to deface currency but can three pennies really be considered currency? What can you buy for $0.03?

Button and Penny

The drawer width handles most of the 88 key digital pianos but a few of them and many of the 88 key synthesizers would not fit due to the extra controls that they have on the sides of the keys making them too wide. This isn't a design issue but a constraint created by the width of the original cabinet. Should I ever replace my FP-30 I need to check the size and weight specs on the replacement.

email